Unlocking the Joy of Homegrown Dry Beans: Growing & Drying Black and Yellow Eye Beans for Storage
There’s a profound satisfaction that comes from growing your own food, especially when it's something as versatile and resilient as dry beans. This year, we embarked on a particularly rewarding journey: we grew black and yellow beans, transforming a past struggle with bush beans into a vibrant success. If you've ever doubted your ability to harvest beans for storage, prepare to be pleasantly surprised. Our experience shifted from hesitant attempts to anticipating a garden overflowing with these resilient legumes from spring to fall!
In this comprehensive guide, we'll share our firsthand insights into cultivating, harvesting, and perfectly drying black and yellow eye beans, ensuring you have a steady supply for delicious meals all winter long. Get ready to turn your garden plots, no matter how small, into a treasure trove of homegrown goodness.
Planting and Nurturing Your Bean Patch
Our journey began with a decision to give black beans and yellow eye beans a dedicated shot. These varieties are not only incredibly flavorful but also excellent for drying and long-term storage, making them perfect candidates for a self-sufficient pantry. We've learned that while bush beans can sometimes be tricky in confined spaces, they can truly thrive with the right conditions. It's possible that improved soil, better watering practices, or simply a beneficial shift in garden luck played a role, but our 4x4 raised beds, once a challenge for bush beans, became lush havens for our bean plants.
Choosing the Right Varieties and Timing
- Black Beans: A staple in countless cuisines, black beans are prized for their earthy flavor, firm texture, and nutritional value. They hold up beautifully in soups, stews, and, of course, tacos.
- Yellow Eye Beans: These distinct beans, with their unique "eye" pattern, offer a mild, slightly sweet flavor. They are traditionally used in classic recipes like homemade baked beans and are a delightful addition to any dry bean collection.
- Planting Dates: For us, direct sowing on June 26th proved ideal. This timing allowed the soil to warm sufficiently after the last frost, promoting vigorous germination and growth. Depending on your specific climate zone, you might plant earlier or later, but remember that beans are warm-season crops and sensitive to cold.
- Sowing Method: We planted seeds directly into the soil, which is generally the most straightforward and successful approach for beans. Ensure good soil drainage and plenty of sunlight – at least 6-8 hours daily – for optimal growth. Bush bean varieties are excellent for smaller gardens or raised beds as they don't require vertical support.
Nurturing your bean plants throughout the growing season involves consistent watering, especially during critical periods like flowering and pod development. Keep an eye out for common pests and diseases, addressing them promptly to ensure healthy, productive plants. A healthy plant is the foundation for a robust harvest of plump, storable beans.
Harvesting and Perfecting the Drying Process
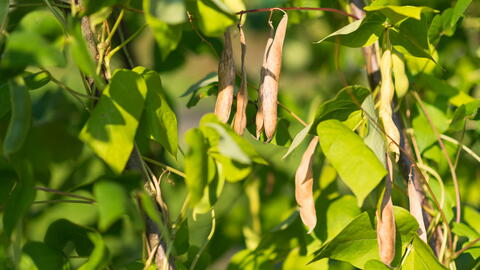
Patience is paramount when growing dry beans. Unlike snap beans, which are picked young and tender, dry beans need to fully mature and dry on the plant until their pods are brittle. This crucial step allows the beans inside to fully develop, harden, and naturally dry, preparing them for long-term storage.
When to Harvest Dry Beans
Our harvesting began around September 11th, roughly two and a half months after planting. The key indicators for readiness are primarily visual:
- Plant Condition: Look for plants that are noticeably dried out. Their leaves will shrivel, turn yellow or brown, and the stems might become stiff. The pods themselves should be dry, hard, and possibly discolored. This natural drying on the plant is the most energy-efficient method, as nature does most of the work for you.
- The "Rattle Test": To confirm if the beans inside are truly dry, gently shake a pod. If you can hear the beans rattling freely within, they are perfectly dry and ready for immediate shelling. This is an essential test to prevent spoilage.
For the beans that were fully dry on the plant, we simply picked the brittle pods and tossed them into a basket, ready for shelling. This initial collection is incredibly satisfying, as you begin to see the tangible results of your gardening efforts. For a deeper dive into this stage, including visual cues, check out Our First Successful Dry Bean Harvest: Black & Yellow Varieties.
Mastering Indoor Drying for Long-Term Storage
It's common for not all beans to dry perfectly on the plant, especially if your growing season concludes with unexpected rain, humidity, or cooler temperatures. This is where indoor drying becomes a critical step to ensure your beans store well without molding or spoiling.
- Gathering Partially Dried Plants: If some plants have mature pods but are still a bit green or pliable, harvest the entire plant by cutting it at the base. You can also pick individual pods if the plant is too large.
- Creating an Ideal Drying Environment: We found success by hanging these partially dried plants (or even just bundles of pods on stems) in a well-ventilated, protected indoor space. Our stairwell, with its consistent airflow and absence of direct sunlight or excessive humidity, proved to be an excellent spot.
- Protection from Moisture: Drying beans indoors is paramount. A sudden rain shower or even heavy morning dew can rehydrate your almost-dry beans, undoing all your hard work and making them highly susceptible to mold. Choose a location that is safe from all forms of moisture.
- Patience for Complete Drying: These partially dried plants took an additional two weeks to completely dry indoors. You'll know they're truly ready when the pods are brittle to the touch, and the beans inside pass the aforementioned rattle test.
Proper drying is arguably the most important factor for successful long-term storage. Beans that aren't sufficiently dry will quickly spoil or sprout during storage. For more detailed insights into various drying techniques and tips for ensuring optimal dryness, check out our dedicated guide: Tips for Drying Homegrown Beans on the Plant and Indoors.
The Final Steps: Shelling, Storing, and Enjoying Your Harvest
Once your black and yellow eye beans are thoroughly dried, the final, incredibly satisfying step is shelling them. This is where you truly appreciate the beauty and abundance of your homegrown harvest.
- The Joy of Shelling: We settled down, basket in hand, and began the meditative process of cracking open the brittle pods. It's a simple, rhythmic task, perfect for quiet reflection or enjoying with family.
- Behold the Beauty: The sheer variety and natural beauty of the beans themselves are captivating. We couldn't help but marvel at our black beans – their uniform, dark sheen promising rich, hearty meals. And the yellow eye beans? Each one is a tiny work of art, with unique patterns and variations in its distinct yellow "eye." It's truly a delight to see the diversity you've cultivated.
- Initial Delights and Culinary Versatility: The anticipation of cooking with our homegrown beans was palpable. Our black beans quickly found their way into a delicious taco recipe, proving that fresh-from-the-garden flavor is simply unmatched. For the yellow eye beans, we're already envisioning a batch of comforting homemade baked beans, bursting with wholesome goodness. These versatile legumes are perfect for countless dishes, from hearty soups and stews to vibrant salads and chili.
- Long-Term Storage: Once shelled, your thoroughly dried beans are ready for storage. The best method is to store them in airtight containers, such as glass mason jars or food-grade buckets, in a cool, dark, and dry pantry. This protects them from moisture, light, and pests, allowing them to last for years, providing a reliable source of nutrition throughout the winter and beyond. We particularly love using colorful mason jars; they not only provide practical storage but also beautifully display our vibrant harvest.
The experience of growing, drying, and shelling your own dry beans is profoundly rewarding. Not only do you gain a supply of nutritious, delicious food, but you also deepen your connection to the food system and develop valuable self-sufficiency skills.
Conclusion: Your Winter Pantry Awaits!
From initial doubts to a bountiful harvest, our journey growing black and yellow eye beans has been an absolute triumph. We grew black and yellow beans that filled our beds, dried perfectly, and are now ready to nourish us through the colder months. This experience has proven that with a little patience and attention to detail, anyone can achieve a successful dry bean harvest, even in limited spaces. The flavor, the freshness, and the deep satisfaction of knowing exactly where your food comes from are unparalleled. So, why not give it a try? Plant some seeds, watch them grow, and prepare to enjoy the incredible rewards of your very own homegrown black and yellow eye beans, ready for storage and countless delicious meals.
